


Mission Trails Regional Park (MTRP) is a 7200 acre recreation area in San Diego County. It’s amazing to think that it’s nearly 60 miles of trails are located just 8 miles away from downtown San Diego. There are five main peaks located within Mission Trails Regional Park, Cowles Mountain, Pyles Peak, Kwaay Paay Peak, South Fortuna, and North Fortuna. The vast majority of visitors to MTRP hike to the summit of Cowles Mountain and call it a day, having never taken the time to explore the other sections of the park. To help bring awareness to the expanse of Mission Trails Regional Park, and to distribute trail traffic, the 5 Peak Challenge was created in 2015. The challenge is for hikers and trail runners to visit all 5 peaks within MTRP using established park trails.
In April of 2017, I decided to take on the 5 Peak Challenge, and to complete it in one day! I heard a gentleman at the visitor center say that only 5% of 5 Peak Challenge finishers do it in one day. Now that I have completed the 5 Peak Challenge, I will include my strategy, photos, maps, and planning resources into this 5 Peak Challenge Guide.


Rules of Participation
- To complete the 5 Peak Challenge, use the MTRP trail map to hike on established trails to the five peaks. MTRP includes suggested routes using the color coded trails below. I will include my map, strategy, and logistics later in this post.

Trail Map With Recommended Routes from http://www.mtrp.org 
- Take a selfie or self portrait at the summit of each of the five peaks. Make sure to get the summit marker or post in each photo.
 Cowles Mountain
 Pyles Peak
 Kwaay Paay Peak
 South Fortuna Summit
 North Fortuna Summit
 - Email the summit photos to 5-peakchallenge@mtrp.org at the completion of your challenge. Include your full name in the email, to be used on your certificate. After you’ve been notified, stop by the visitor center from 10AM-4PM to collect your certificate and pin.
*You can also stop by the visitor center on the same day as your challenge for a ‘walk-in’ submission if you’re from out of town like me.*
Completion Certificate


Resources, Maps, and Directions:
Being from out of town, I knew I would need to complete the 5 Peak Challenge in one day. To make this one day challenge as manageable as possible, I started looking at the map to find the shortest route using established park trails. I realized early on, that the best strategy would be to start early with Cowles and Pyles since they can be done together, and because Cowles is the most crowded. From Cowles and Pyles, I drove to the trailhead of Kwaay Paay. From Kwaay Paay, I drove to the East Fortuna Staging Area for South And North Fortuna. I could have avoided driving from trailhead to trailhead with a few miles of road hiking, but wanted to save time and mileage.
In the sections below, I will break down the three hikes I did to cover the five peaks in the 5 Peak Challenge. Here is an aggregate overview of the entire 5 Peak Challenge using my trail connections and strategy.
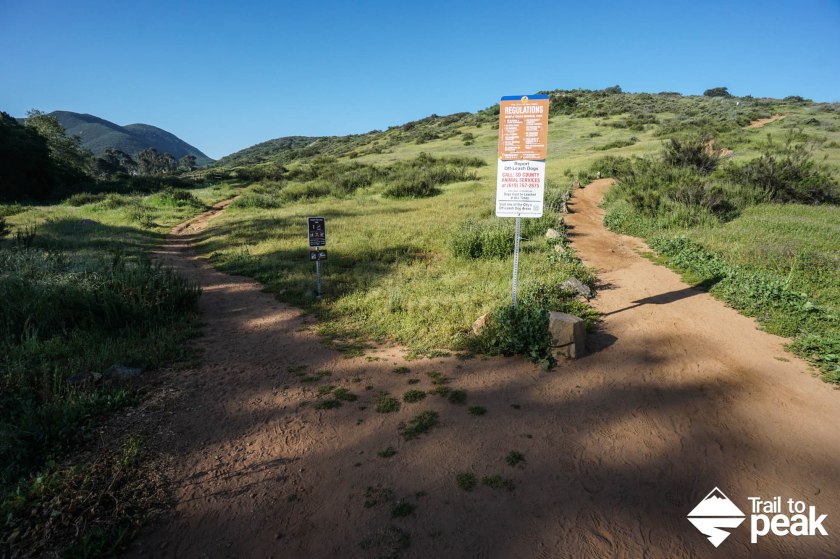
- I began the 5 Peak Challenge by hiking Cowles Mountain and Pyles Peak. To do this drive to 7027 Golfcrest Dr, San Diego, CA 92119. There is a small parking lot at the trailhead that fills up quickly, but residential street parking is also available.
- Download Cowles and Pyles GPX
- Download Kwaay Paay GPX
- Download South and North Gortuna GPX
- See my track on AllTrails
- Download PDF

- Total Distance: 15.77 miles
- Total Elevation Gain: 4249 ft
- Minimum Elevation: 305 ft
- Maximum Elevation: 1592 ft
- Time: It took me a little under 6 hours to hike all six peaks from start to finish. This is doable if you’re in peak fitness, otherwise budget much more time, or plan on completing the challenge over multiple days.
- Difficulty: Moderate (3 out of 5)
- Dog Friendly: Yes, on leash
- Permit Required: No
- Season: Year round
- Trail Condition: The trail is somewhat steep in places, but well maintained, well marked, and easy to follow.
- Cell Phone Reception: Very good
- Make sure to hike with the right gear. See my current hiking gear list.
The 5 Peak Challenge Of Mission Trails Regional Park
Cowles Mountain and Pyles Peak – Peaks 1 and 2
At 1,592ft, Cowles Mountain is the highest peak in the city of San Diego. The hike to the summit of Cowles is possibly the most popular hiking route in all of San Diego County, which makes an early start a requirement for the 5 Peak Challenge. Hiking to the nearby Pyles Peak is far less popular, and the perfect addition to a hike up Cowles.

Directions And GPS Tracks:
- To hike to the summits of Cowles Mountain and Pyles Peak, drive to 7027 Golfcrest Dr, San Diego, CA 92119. There is a small parking lot at the trailhead that fills up quickly, but residential street parking is also available.
- Download GPX
- See my track on Strava

Key Points:
- Distance: 6 miles
- Elevation Gain: 1854 ft
- Minimum Elevation: 668 ft
- Maximum Elevation: 1592 ft
- Time: 2-4 hours
- Difficulty: Moderate
- Dog Friendly: Yes, on leash
- Permit Required: No
- Parking: Parking lot at trailhead and street parking for overflow
- Season: Year Round
- Trail Condition: The trail is somewhat steep, well maintained, well marked, and easy to follow
- Cell Phone Reception: Very good
Make sure to hike with the right gear. See my current hiking gear list.
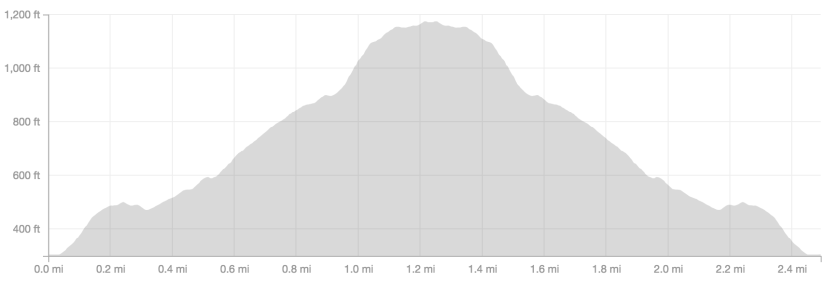
Hike Map And Elevation Profile:


Hike Description:
0.0 Miles- As I mentioned in the intro, this is a very popular hike that can get very crowded. Make sure to arrive early. I started this hike at 6:30 AM to make sure I’d have enough time and space to enjoy the trail. There are restrooms located at the trailhead next to the signage for “Cowles Mountain Staging Area”.
The first quarter mile of hiking is very gradual, but the incline quickly increases. Take time to enjoy the blooming wildflowers (seasonal), and don’t forget to look back at the city views that will increase with every step upward.


The trail for Cowles Mountain is in great condition, but the rainy season can leave sections rutted, and erosion can expose stones that will leave unprotected feet tender. Make sure to wear good trail shoes with grip and protection for this hike. You can check out my guide to finding the perfect trail shoe if you’re in need of a new pair.


0.5 Miles- You’ll have a view with two peaks up ahead. The trails wraps around the first hill to the right and then Cowles will be the higher mountain to the left.


0.9 Miles- You’ll see the junction for the Barker Damn Trail. This is another trailhead start option if you’d prefer to avoid the high traffic found at the Cowles Mountain Staging Area. Keep left at the junction to continue on to Cowles Mountain.
Just after passing the Barker Dam trail junction, you’ll scale a series of switchbacks that will take you to the summit of Cowles Mountain.


1.5 Miles- At 1.5 miles you’ll be standing at the summit of Cowles Mountain. Take a look around, enjoy the views, and then make your way to the north end of the summit towards the antennas.


When you see the antennas and a rock outcrop take a left (west) to pick up the Pyles Peak Trail. You’ll see a small brown sign close to the ground that reads Pyles Peak Trail.


After hiking uphill to the summit of Cowles Mountain, you’ll have two descents and two ascents before reaching the summit of Pyles Peak. You’ll be able to catch glimpses of Pyles Peak and Kwaay Paay Peak up ahead.


2.3 Miles- You’ll see a sign for “View Point”. This is a short side trail that takes hikers to a viewpoint between Pyles and Cowles. Continue on towards Pyles Peak by continuing straight ahead.


2.6 Miles- You’ll see the final trail sign for Pyles Peak with a view of the summit above.

3.0 Miles- You’re standing on the 1,379ft summit of Pyles Peak. From this point, you can turn around and return to the trailhead on the same path that you arrived with.


Kwaay Paay Peak – Peak 3
Kwaay Paay Peak is probably the least renowned of the five peaks in Mission Trails Regional Park. At only 2.4 miles roundtrip, it’s a hike that on paper seems rather unremarkable. The experience in person is quite different though, as the 1.2 miles to the peak gains almost 900 feet, and offers amazing views of the nearby South and North Fortuna summits.

Directions And GPS Tracks:
- To hike to Kwaay Paay Peak you’ll head to the Father Junipero Serra Trail, drive to 1 Father Junipero Serra Trail, San Diego, CA 92119. You can also start this hike at the Old Mission Dam, which is about a quarter mile west of the main Kwaay Paay Peak trailhead. There is parking available along the street on Junipero Serra Trail, and in a few lots as well.
- Download GPX
- See my track on Strava
Key Points:
- Distance: 2.4
- Elevation Gain: 867 ft
- Minimum Elevation: 305 ft
- Maximum Elevation: 1194 ft
- Time: 1 hours
- Difficulty: Moderate
- Dog Friendly: Yes, on leash
- Permit Required: No
- Parking: Parking lot at trailhead and street parking
- Season: Year Round
- Trail Condition: The trail is steep, well maintained, well marked, and easy to follow
- Cell Phone Reception: Very good
Make sure to hike with the right gear. See my current hiking gear list.
Hike Map And Elevation Profile:


Hike Description:
0.0 Miles- Starting on the trailhead leaving from Junipero Serra Trail, walk along the dirt path heading southwest. Just 0.1 miles into the hike, the trail forks, giving hikers two options towards the summit of Kwaay Paay. I suggest keeping right at the junction for a more direct route.


0.25 Miles- You’ll reach the top of your first climb, and get a taste of the views that await you at the summit of Kwaay Paay. After a very brief downhill reprieve, your climbing will begin again in earnest.


0.8 Miles- You reach the steepest part of this hike. There are a few sections that are loose with gravel filled ruts. Make sure to be mindful of your footing here, especially on your way back down.


1.2 Miles- Kwaay Paay Peak! Take in the view of Cowles Mountain and Pyles Peak to the southeast, and views of North and South Fortuna to the northwest.


South Fortuna and North Fortuna – Peaks 4 and 5
Having hiked to the summits of all five peaks within Mission Trails Regional Parks, the hike to South and North Fortuna from the Fortuna Staging Area was easily my favorite. This hike offers solitude, a trail that parallels running water (seasonal), and the chance to bag two peaks in quick succession for a grand finale to the 5 Peak Challenge!

Directions And GPS Tracks:
- To hike South Fortuna and North Fortuna Mountains, you’ll head to the East Fortuna Equestrian Staging Area. Drive to Equestrian Cir, Santee, CA 92071. There is parking in a dirt lot right near the trailhead of the Spring Canyon Trail.
- Download GPX
- See my track on Strava
- To begin this hike, you can start out on the Spring Canyon Trail or the North Perimeter Trail. You’ll see both heading west in the aerial image below. For this hike writeup, I started with the Spring Canyon Trail and returned via the North Perimeter Trail.


Key Points:
- Distance: 7.1 miles
- Elevation Gain: 1354 ft
- Minimum Elevation: 305 ft
- Maximum Elevation: 1291 ft
- Time: 3-4 hours
- Difficulty: Moderate
- Dog Friendly: Yes, on leash
- Permit Required: No
- Parking: Parking lot at trailhead
- Season: Year Round
- Trail Condition: The is very steep in places, but well maintained, well marked, and easy to follow. There is a section of this hike that can be along water depending on the season.
- Cell Phone Reception: Very good
Hike Map And Elevation Profile:


Hike Description:
0.0 Miles- Start out on the Spring Canyon Trail located at the north end of the East Fortuna Staging Area.


There are two spots in the early stages of this trail that can be covered with water in the rainy season. There are rocks to help hikers get from one side to the other.

0.4 Miles- As the Spring Canyon Trail heads southeast, it intersects with the Grasslands Loop(Crossing) Trail and the North Perimeter Loop Trail. Both of these trails will take you east and eventually where you need to go. For this hike, I stayed on the Grasslands Loop Trail.


0.8 Miles- The Grasslands Loop Trail will run along a wooden fence. Follow the trail along the fence, due south.


1.0 Miles- Leave the Grasslands Loop behind for the Oak Canyon Trail. This is an easy junction to miss, so keep your eyes open!


Oak Canyon Trail runs along a shaded creek for 0.2 miles before venturing out into a little more exposure.


1.3 Miles- The creek takes a turn as the trail heads east, and swells with more water than before. You’ll get to cross over a few bridges here. Make sure to take a little extra caution with your footwork on this stretch of the hike as the rocky trail can be loose in areas.


1.6 Miles- The Oak Canyon Trail intersects the Fortuna Saddle Trail. Head east on the Fortuna Saddle Trail.


Once you’re on the Fortuna Saddle Trail, things start get steep. You’ll gain 500ft of elevation in the next 0.6 miles. I saw one lady fall heading downhill on this section, so make sure to keep your feet firmly planted beneath you.

2.2 Miles- Once you reach the Fortuna Saddle, you can decide if you want to bag South Fortuna or North Fortuna first. I like to finish with the highest peak last, so I took a left at the saddle to summit South Fortuna first.


2.8 Miles- The 1094ft summit of South Fortuna was empty on this day, as it is not a popular destination in the Mission Trails Regional Park. All the more reason to enjoy this one and all the solitude it provides.
Once you’ve spent enough time at the summit, make your way back down to the saddle to summit North Fortuna.


3.4 Miles- Once you’ve made it back to the saddle, head up the trail to North Fortuna. I came upon a rattle snake on this outing. Make sure to keep your eyes open for rattlers all throughout Mission Trail Regional Park.


4.0 Miles- There is a false summit just before reaching the actual summit of North Fortuna. You’ll know you’ve reached the top at 1291ft when you see the summit register and summit post sign.
Once you’ve enjoyed the views and taken some time to rest your legs, you can return the way your arrived via the Fortuna Saddle Trail.


